Practical Compositing Fundamentals for Everyone
In this tutorial, you’ll learn practical compositing fundamentals and the typical process that a Nuke compositor faces in a small project. At the end of this tutorial, one will be able to do a quick compositing (aka slap comp) and fine tune the final result with flexibility based on feedback from supervisors/directors/clients.
For this project, the task involves creating a believable rack focus shots of hundreds of teapots. Given the nature of team work in the industry, the 3DCG renders has been done by the 3D team and it is the compositor’s role to take the various render elements from it to be composited into the desired results.
Again, the goal of this tutorial is to show the fundamentals in a compositing and remember that every facility has their own compositing pipeline but nonetheless shares a common fundamentals in any compositing tasks be it 3DCG, live action or motion graphics.
Compositing for 3DCG
While I’m not a dedicated compositor at my current workplace (my current job involves creating FX elements such as fire, smoke, debris or blood), any FX artists need to know the process of creating a “slap comp” to see if their FX are integrated nicely into the scene.
As mentioned above, we’ll need to create a rack focus animation of the hundreds of teapots and this can be achieved through compositing (with the help of the AOV (Arbitary Output Variables)
aka render elements from the 3D renderer).
Before we proceed, the important skill of a compositor (and pretty much any jobs in this world) is problem solving and being resourceful. To keep things simple for this tutorial, everything
are prepared in a “perfect case scenario” but do keep in mind that in the industry, things often goes awry from my experience (I can’t comment on Western-pipeline studios but it is common occurrence for Japanese-pipeline studios as my workplace is an outsource studios for many Japanese AAA projects).
Basically, prepare to die I mean sacrifice lots of time and money when you just starting out in this industry.
So with that out from the bag, let’s proceed to the actual compositing in Nuke!
(well this tutorial is applicable to other compositing software like After Effects, Fusion, Flame or gasp Shake except you will need to search for the equivalent functions in the respective software)
Multi-channel EXR
Many facilities has picked up multi-channel EXR pipeline as it is a great file format to store various renders layers and channels from a 3D renderer.
The teapots are rendered in Vray for 3ds Max and there are several render elements aka Arbritary Output Variables (AOV) in the EXR:
- RGBA
- Lighting
- Reflection
- MultiMatteElements
- Zdepth
- Velocity
Back in the “Dark Ages of Compositing”, each of the five passes will be output into their own files.
This means there will be lots of micro-managing of the hundreds/thousands of files in your storage and lots of disk/network bottle-necking.
Another benefit of OpenEXR format is the support for 16-bit Half-Float or 32-bit Float which are a necessary evil in today’s high end compositing.
Luckily for us, Nuke has great support for OpenEXR format.
Quickie Briefing
31st August 20XX
Dear compositor,
We need you to comp this teapot animation with rack focus effects and attached is the link to the 3D render files from the 3D department in EXR format.
The project specs is 1408 x 792 at 24fps so remember to set it first in Nuke before you proceed. Don’t forget the final resolution is 720p so please crop all sides of the comp at the final steps of the composite.
The 3D department has provided all the necessary passes for use during compositing and the final delivery is:
720p @ 24fps in QuickTime ProRes 4444, Filename: teapot_Comp_Final_v001.mov
For WIP, please use QuickTime ProRes 422 and label it as teapot_Comp_WIP_v001 and so on.
Please remember to clean up your Nuke script for archiving purpose. Remember to leave notes in the script if you uses any dependencies that is not available for other users.
Tauke
P/S: I need to take down the file from my server since the huge file size of 1.92GB is eating up my precious storage for other important files.
It Begins Here
- Always read the briefing and understand the requirements. If unclear, ask your supervisor/client but know your limit as you don’t want to annoy them with redundant questions.
- Typically the render files will be located in the server and if you have the storage space on your local workstation, I recommend copying it to your local drive (whenever possible) to prevent network bottlenecking from various activities by your colleagues.
- For this project, I already setup relative linking in the Nuke script. Remember to use Linux style of pathnames and not Windows style in Nuke.
- While you can load in the teapot image sequences by using a Read node and browse to the directory, I prefer to drag and drop the folder that contains the image sequences onto the Node Graph.
- Next, open up the Project Settings by hovering the mouse cursor onto the Node Graph and pressing S. This will bring up the Project Settings in the Properties panel and adjust the necessary settings to conform to the specifications based on the briefing.
- Since we are dealing with multiple passes, I always made it a habit to inspect the extra render passes by switching the channels in the Viewer panel. Remember to gamma up/down the viewer to see if the render are not clamped to 8-bit. If such thing happened… time to inform the 3D team to re-render it properly.
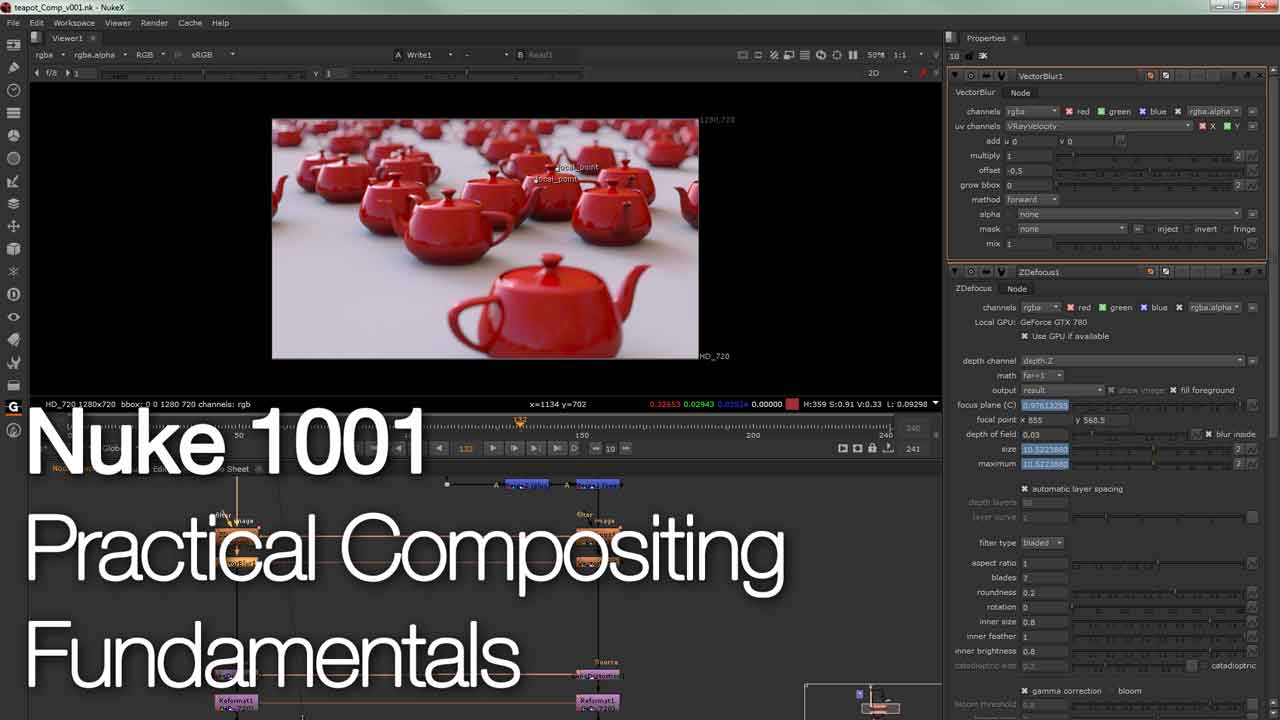
- Once you are done inspecting the other passes, the crucial pass to get the rack focus effect working will be the Zdepth pass. So before we can start using it, put in a ZDefocus node by pressing tab on the Node Graph, type ZDefocus and highlight it before pressing Enter.
- The Zdepth pass contains information about the distance of the surfaces of scene object from the camera viewpoint. Hence it has several uses depending on the compositor which in this case, we’ll be using it to drive the rack focus animation. In ZDefocus properties, set the channels to RGBA and choose depth.Z for the depth channel (which is the default settings).
- For the math, choose “far=1” to properly match the Zdepth data generated from Vray. (Depending on the renderer and output settings, you’ll likely need to play around with the math formula to get the correct results that you’re looking for. Always remember that in most production, there will be a manual written by the supervisor on the proper usage of the render passes for the chosen compositing software)
- Now we will animate the rack focus by using the Set Key function. The attributes that we want to animate are the focus plane (C), depth of field and size. Feel free to play around to achieve the rack focus animation.
- Depending on the situation, I prefer to apply motion blur before the depth of field. Nuke has several great motion blur nodes and we’ll be using the Vector Blur which requires a Velocity pass to drive the motion blur amount. Again, remember to conform to the specifications of the project as different facility has their own settings when generating the Velocity pass.
- For this case, a value of 1 for the Multiply is appropriate. If you find the motion blur amount is off, the first thing you want to tweak will be the Multiply parameter.
- At this stage, we are nearly done with the overall compositing but let’s pretend that the director/client need us to increase the reflection strength on the teapot. Instead of going back to the 3D team and ask them to increase the reflection strength and *gasp* re-render it, we are in luck as we already have the Reflection pass that we can use in combination of the Lighting pass. Since we have been using the Beauty pass, we need to reconstruct the Beauty pass from the other AOV aka the Reflection and Lighting pass.
- Merge both passes using the Plus operation to achieve the same look as the Beauty.
- As we now have the Reflection pass separate from the Lighting pass, add a Grade node to colour correct the Reflection pass to increase the contrast/brightness based on the feedback.
- Also noticed that in the RGBA channels… the alpha are a solid white and that means we’re in trouble as we can’t isolate the distant background properly. Luckily the 3D team did output a MultiMatte elements for both the teapot and ground which we’ll use the ChannelMerge operation to merge (plus) the Red and Green channels of MultiMatteElements and output it to the Alpha in RGBA.
- Premult it with the invert option checked and merge over the colour corrected teapot on top of the distant background.
- Before we wrap this up, the 3D render looks perfect and a little bit of imperfection to the image quality will help to improve the photorealism of the scene. Chromatic Aberration (CA) and Lens Distortion are applied after you have done compositing all the required elements. Preferably, do reference real-life footage and study it carefully when tweaking the amount of CA and lens distortion. For this project, I omitted CA as I wanted a great image quality as shot on high quality lens and you can read up on how to use lens distortion here.
- After that, we need to crop the composition to 1280×720 from 1408×792. To achieve this, use the Reformat node instead of the Crop node and select the correct output format (HD_720) and the resize type to None.
- That sums up this tutorial and you can playback your result in the Viewer to see the rack focus animation.
- You’ll notice that I skipped the process of writing the QuickTime MOV files. Since we don’t really have a supervisor or client to show the progress… you can still output it for fun.

