Roto the Toto
OK one of the early serious attempt for me when learning VFX stuff is rotoscoping.
Ironically rotoscoping is the bane of all college/university students (the lecturers even encouraged students to minimize (read:avoid) it even for final year project!).
Regardless of your software of choice, rotoscoping is applicable to all major compositing software (Nuke, After Effects, Flame, Fusion etc) and also tracking software such as Mocha and PFTrack.
That said, this post focus on rotoscoping in Nuke.
Before I Begin
There is two links I highly recommend reading that offers great tips in rotoscoping in general.
Conrad Nelson list down his top 10 tips in rotoscoping and Martin Constable has written a great intro to rotoscoping on his wiki.
So What is Rotoscoping?
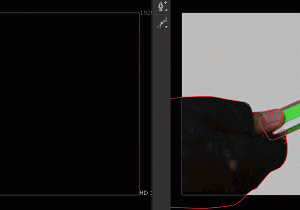
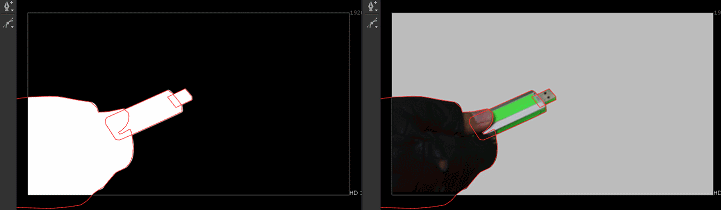
The process of generating matte (aka mask) to extract the required elements in a shot (the black and white portion in the above GIF is the matte).
It is also use to quickly generate garbage matte to remove unwanted elements or block in any gap from less than perfect keying (from tools such as Keyer, Primatte, Keylight, IBK etc).
Nuking the Tedious Rotoscoping Process
One of the great thing about rotoscoping is the ease of learning.
Yes it is easy to learn BUT difficult to master. Don’t forget it is also time consuming depending on the shot!
Still everyone can benefit from picking up new tricks to boost their rotoscoping quality and below is a list of tricks that I used in my rotoscoping task in Nuke.
1. Transform, Rotate, Scale, Skew the Roto Shapes
Whenever possible, DO NOT MOVE point by point. Study the subject matter carefully and often you can move several points at a time to minimize the roto shapes from “swimming” from one keyframe to another keyframe.
Of course there is exception like really fast movement that changes drastically frame by frame but really, “TRSS” the roto shapes.
2. Ripple Edit
This is another favourite feature for me in Nuke. Let’s say you have completed a roto and realise you need to adjust some points just by a tiny bit of pixels for the whole shot duration.
If you come from Shake… that means going back to adjust every single keyframes.
With Ripple edit enabled, Nuke will automatically adjust the other keyframes automatically whenever you adjust a point at any keyframe.
P/S: While awesome, DO LOOK OUT IF YOU ACCIDENTALLY ENABLED IT. Nothing worse than adjusting some points drastically with the Ripple edit enabled…
3. Feathering the Edges
If you need to deal with the occasional soft edges, feather out the necessary points. Preferably this is a better choice than employing motion blur which can be hard to predict and also takes longer time to render.
4. Motion Blur/Time Blur
There is now the options to use Shape Blur or Global Blur starting from Nuke 7.0. If there is a lot of motion blur for the subject matter, I recommend using it as it can save time with proper planning.
Another approach is to utilize the Time Blur node to apply the motion blur effect to your roto.
It’s hard to say which one is more practical so feel free to try out both approach.
5. Breaking Down Parts
Analyze the subject matter and see if it is possible to roto in several smaller parts to maintain consistency.
Nothing worse than rotoscoping a large shape with lots of points just to cover up the talent’s ear that appears for around 20 frames and disappear throughout the shot. It will lead to a chattering in edges.
Also different parts allows you to configure each motion blur settings individually.
6. Limit/Increase the Amount of Points
General rule of thumb is to limit the amount of points in your roto. Less points means less chances of your shapes chattering at the edges.
Although there are times it is better to increase the amount of points when dealing with complex shapes.
Just be vigilant if the need arise to use more points for the roto shapes.
7. Bezier versus B-Spline
Bezier shape is pretty common if you have use the Pen tool in both Photoshop and Illustrator. The B-Spline produces a more organic aka rounder shapes compared to Bezier.
Still it’s hard to say which one is more better as it depends on the individual.
Although obviously you will not want to use B-Spline for sharp corners objects. Use Bezier for it.
8. Stabilizing Plates
If you ever need to roto a subject such as man made object (furniture, buildings, vehicles), it is best if you can stabilize the plate and roto from it.
Once you are done with it, use back the same tracking data to invert the stabilization (aka matchmove it) of the roto shapes.
9. Attaching Tracking Data
Let’s say you have a moving object, it is better to track it and attach the tracking data to the roto shapes.
This will help to reduce the amount of hand placed keyframes in your roto.
10. Straight to the Point aka Don’t Drift a Point Feature!
Remember where you place a point! No point (no pun intended) to put a point at the elbow in the first frame only to have it drift to the shoulder of the subject…
Keep it consistent and it will save you lots of headache in the long run.

