Blood FX using RealFlow as seen in Gantz: O
With Gantz: O premiering on 14 Oct 2016 in Japan, I’m proud to be part of the production team as the FX artist for the film.
While there are many challenges throughout the production that I wish can be handled better, there is one thing that the film are not afraid in showing visually is… blood! Well 3D fluid simulation instead of fake blood.
For this tutorial, the scene file and settings was based on my own personal R&D to generate a blood squirt and slash for the many shots in the film that I was tasked for.
So why the personal R&D?
Well there is an in-house blood asset BUT it is really heavy to sim (on a Intel Core i7 3930K 3.5GHz) and this prompted me to improvised a new setup that sim faster for faster WIP turnaround for the FX supervisor and director.
I’ve noted down the necessary settings that one need to modify to shape the blood and the simulation variable depending on the situation.
What will this tutorial covered?
- In-depth explanation the blood creation in RealFlow (setting up SPH emitter, meshing, cache and graph editor)
- Quick glance on importing the BIN mesh into Digital Content Creation like 3ds Max or Maya.
If time permits, I’ll be updating this tutorial on the look development of the blood aka material setup and rendering using Vray and compositing in After Effects/Nuke.
Before we start
Make sure that you know the scale of your scene setup as RealFlow internal scale system differs from 3ds Max and Maya.
Maya is the primary software used in production and the scene scale was set to Centimeter (cm) and RealFlow uses Meter (m) as the default scene scale.
This means we need to export the necessary data from Maya to RealFlow and vice versa.
To keep things simple, we don’t need to worry about scene scale conversion as majority of the shots are done with the default scale for the respective software.
The pipeline goes like this:
Export Characters and Background (Maya with cm unit) -> Blood Simulation (RealFlow with m unit) -> Importing generated Blood Mesh from RealFlow into Maya
This ensures the blood that you see in RealFlow is exactly the same in Maya once you imported the blood mesh.
Getting started
For the production of Gantz: O, every shots have their own unique blood sim which means I can’t reuse the same sim for other shots (heh) and if possible, make sure to have your own characters/creatures animation exported to RealFlow.
Download the project files here (RealFlow 2014).
- Create a standard SPH particles emitter. I use the Circle emitter for my blood sim in Gantz: O.
- Use the following settings as shown in the diagram. The blue label shows the required changes from the default emitter value.
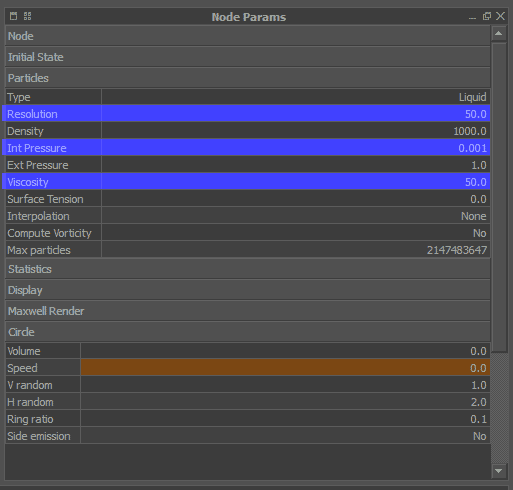
- Position the emitter to where the blood need to emit from (e.g.: sliced wound from katana, gunshot impact, etc)
- Fiddle with the Circle parameters. Higher V/H random means more violent burst. I usually use a value of 0.1 for Ring Ratio.
- Animate the Speed. Refer the following diagram:

- Before we start the actual simulation, let’s refer to the following diagram for the list of Daemons that I used:
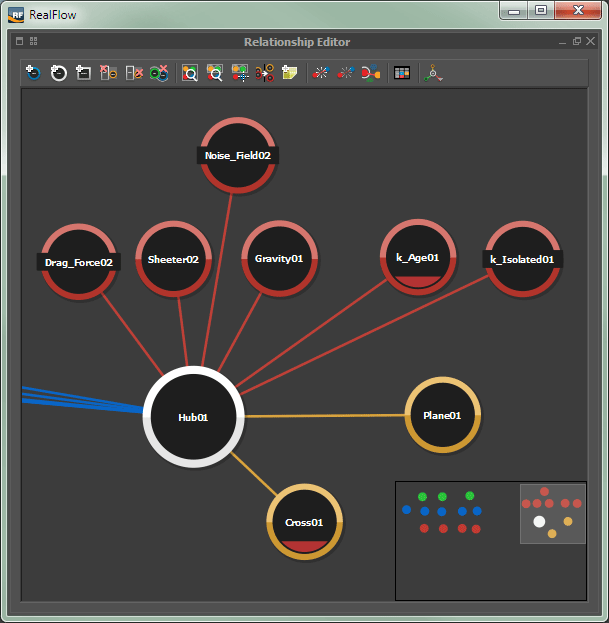
- Quick description of the listed Daemons above:
- Drag Force add drag to the blood so it doesn’t travel with zero resistance. Keyframe it appropriately for high-speed shot. The default value is 0.1 but I find it to be slow down the emitter too much so I used 0.01.
- Sheeter is needed to create the tendrils after the blood emitted. The min cavity size is very sensitive so you want to adjust in increment of 0.1. My setup uses a value of 1.0. Make sure to enable Create Tendrils and set the appropriate number for the @ count value. I use 10 as RealFlow will attempt to create approximately 10 tendrils but it can either go higher or lower depending on the simulation. Also remember to up the @ strength value (I used 50) so the blood will have nice wavy “blood-looking” tendrils.
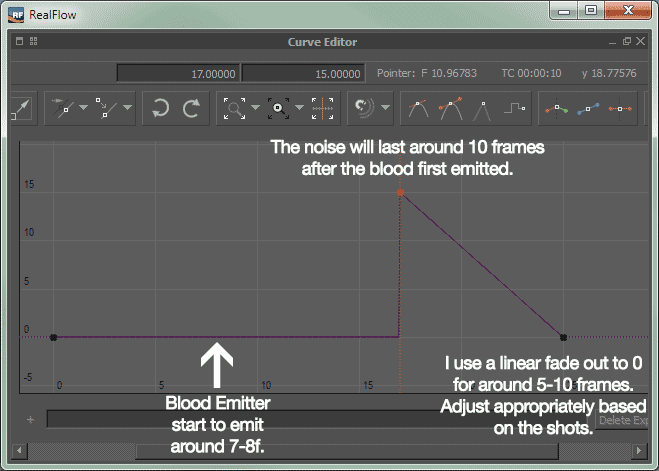
- Noise Field is really critical to break the shape of the blood in world space and I usually animate it to last 10-15 frames after the blood emitted before the noise fade out to 0. Make sure to set this Noise Field to affect Force. Leave Space and Time scale at the default 1.0. Refer to the following diagram for more description.
- Gravity is a 2013 British-American science fiction film co-written, co-edited, produced and directed by Alfonso Cuarón. Ahem, Gravity means what goes up must come down… well more like the direction where the Gravity is pointed. Remember to up the Gravity strength appropriately if the blood is falling down slowly as the default value of 9.8 can be really slow. I used 98.0 for my setup.
- k_Age is situational but currently disabled in my setup as it is meant to kill the particles after a certain amount of time (frames). Super useful if your shots have the blood flown out of frame where you can kill the particles for faster simulation.
- k_Isolated helps to kill *isolated* aka stray particles after a certain amount of time. The value is in second so the default value of 1.0 is more than sufficient.
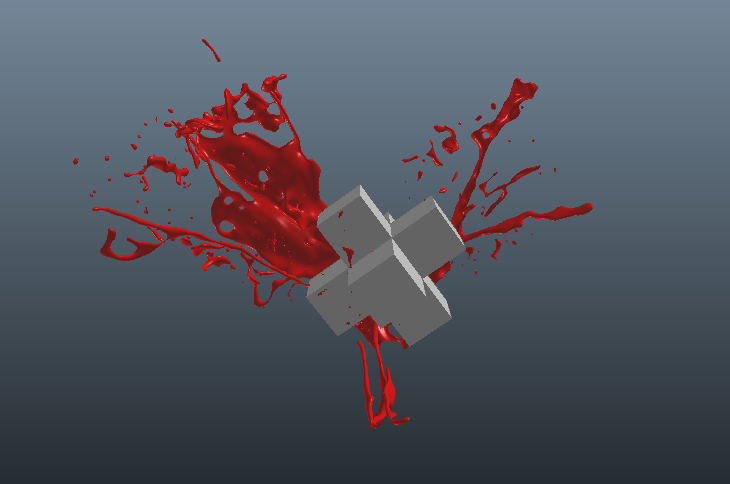
- For geometry collision, I prefer to use standard geometry inside RealFlow unless you have specific custom mesh which you can import into RealFlow through OBJ or SD file. In the screenshot below, I used a Cross geometry as a collision to break the shape of the blood.
- The following settings for Liquid – Particles Interaction are pretty much my go to values if I arrange a geometry to collide with the blood emission:
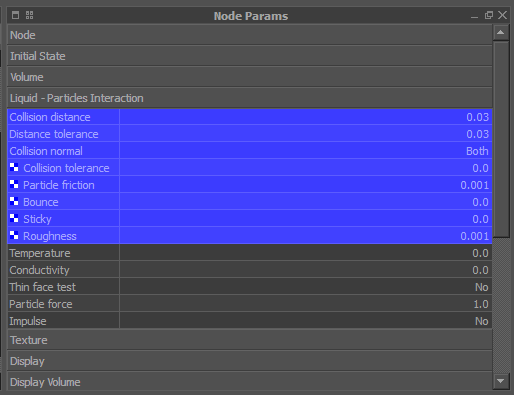
- Collision Distance and Distance Tolerance: Keep both of them at the same value (this affects the “collision” thickness of the geometry).
- Collision Normal: Leave it at Both.
- Collision Tolerance: Leave it at 0.0.
- Particle Friction: 0.001 is just sweet if all you need is to break the blood emission. What about floor/wall/etc? This is where you up the value to 0.4 and higher so the blood flow will stick/stop onto the geometry surface. Remember you can keyframe the friction (e.g.: if you need animate the blood flowing and slowly stop on a floor).
- Bounce: Leave it at 0.0 (I personally have never use it before)
- Sticky: Leave it at 0.0 although you can try to up the value although Particle Friction does a better job.
- Roughness: Leave it at 0.001 (think of it as randomizer for the friction).
- Before we start simulating, let’s go over the Simulation Options (refer to the following screenshot):
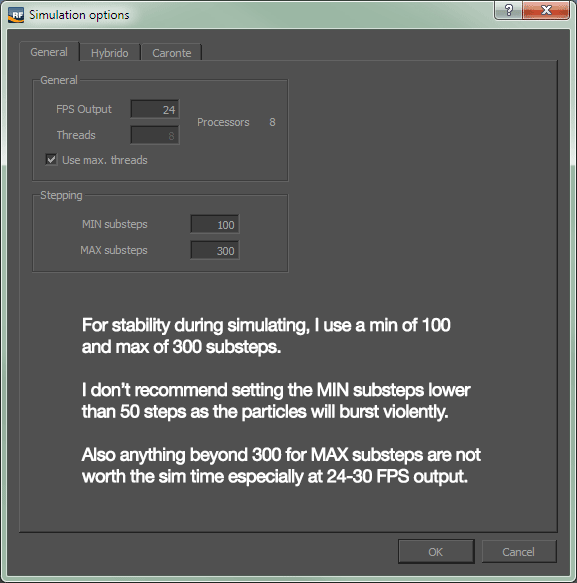
- If possible, always try to stick to as high as possible for your sim as using a low substeps for testing is a complete waste of time due as the particles are susceptible to burst violently.
- Easy said than done, there are times when you need to speed up your sim due to very tight deadline *ahem* so I prepare the following settings with a brief note:
- Quick Sim (MIN: 50, MAX: 150) – Use this if the blood sim doesn’t interact with any objects in the shots.
- Decent Sim (MIN: 100, MAX: 300) – All purpose sim that is stable for most situations. Slower sim time obviously.
- Beauty Sim (MIN: 300, MAX: 333) – The beautiful part of this settings is that the blood sim rarely goes wrong. Also *beautiful* (read: very slow) sim time…
- Once you have decide on the min/max substeps, hit on Simulate and hope all goes well! There is always the Reset button to revert back to square one in case the simulation went awry or it doesn’t look the way you wanted to achieve.
It’s meshing time!
Whenever possible, do not mesh during simulation as it will further slow down the overall sim time!
For meshing, there do not have a magic number to it as it all depends on the situation of the shots. I’ll briefly go through this process as it is a matter of experimenting the value to get the right look for the blood.
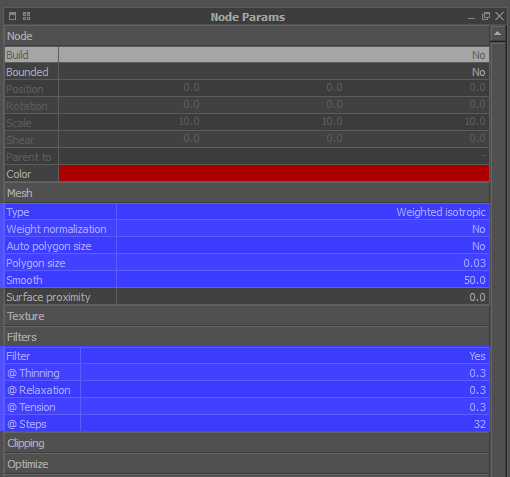
Mesh
- Type: Use Weighted isotropic (default value)
- Weight normalization: No (default value)
- Auto polygon size: No (default value AND DON’T ENABLE IT PLEASE as it is hard to predict the shape of the automatic shape that RealFlow will generate)
- Polygon size: 0.03 (this should be a nice balance for most situation as the anything lower means bigger mesh filesize for a diminishing value in the overall shape. Higher value will result in smaller mesh filesize with a jagged look to the blood which are not desirable unless it is a very fast blood movement)
- Smooth: 50.0 (default value and I never touch it as I prefer to use Filters which I covered below)
Filters (take note to use the same value for Thinning, Relation and Tension)
- Filter: Yes (self-explanatory and it does increase a miniscule amount of meshing time but worth it)
- @ Thinning: 0.3 (think of it sharpening the edges of the fluid through mesh shrink which is useful if you want that elongated stringy blood)
- @ Relaxation: 0.3 (helps to round off the edges and slightly stretches the blood mesh)
- @ Tension: 0.3 (smooth out high frequency noise aka uneven surface of the blood)
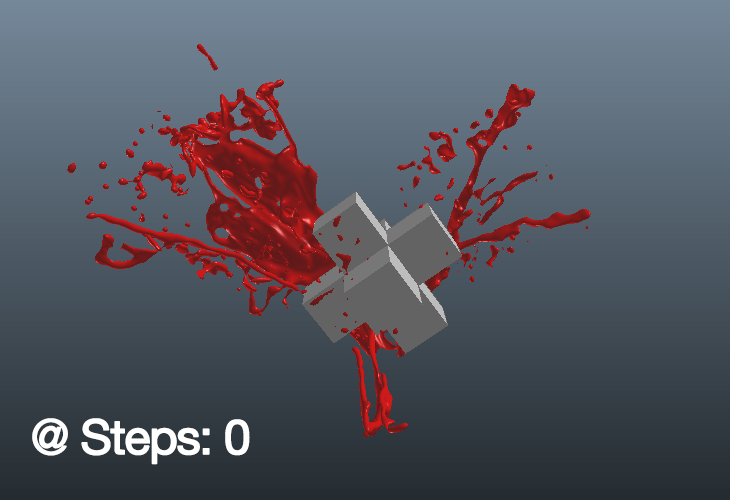
- @ Steps: 32 (think of iterations and higher value result in thinner looking blood. Refer to the animated GIF below)
Importing the Blood Mesh into Maya
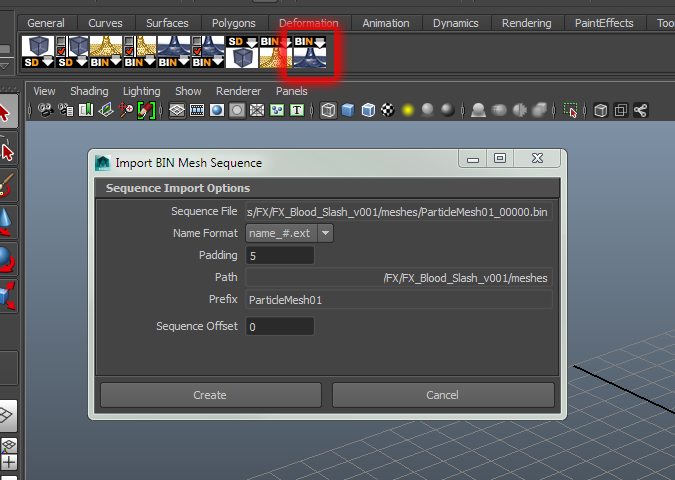
You need to have the RealFlow Connectivity Plugins for your DCC of choice before you’ll be able to import the mesh BIN sequence.
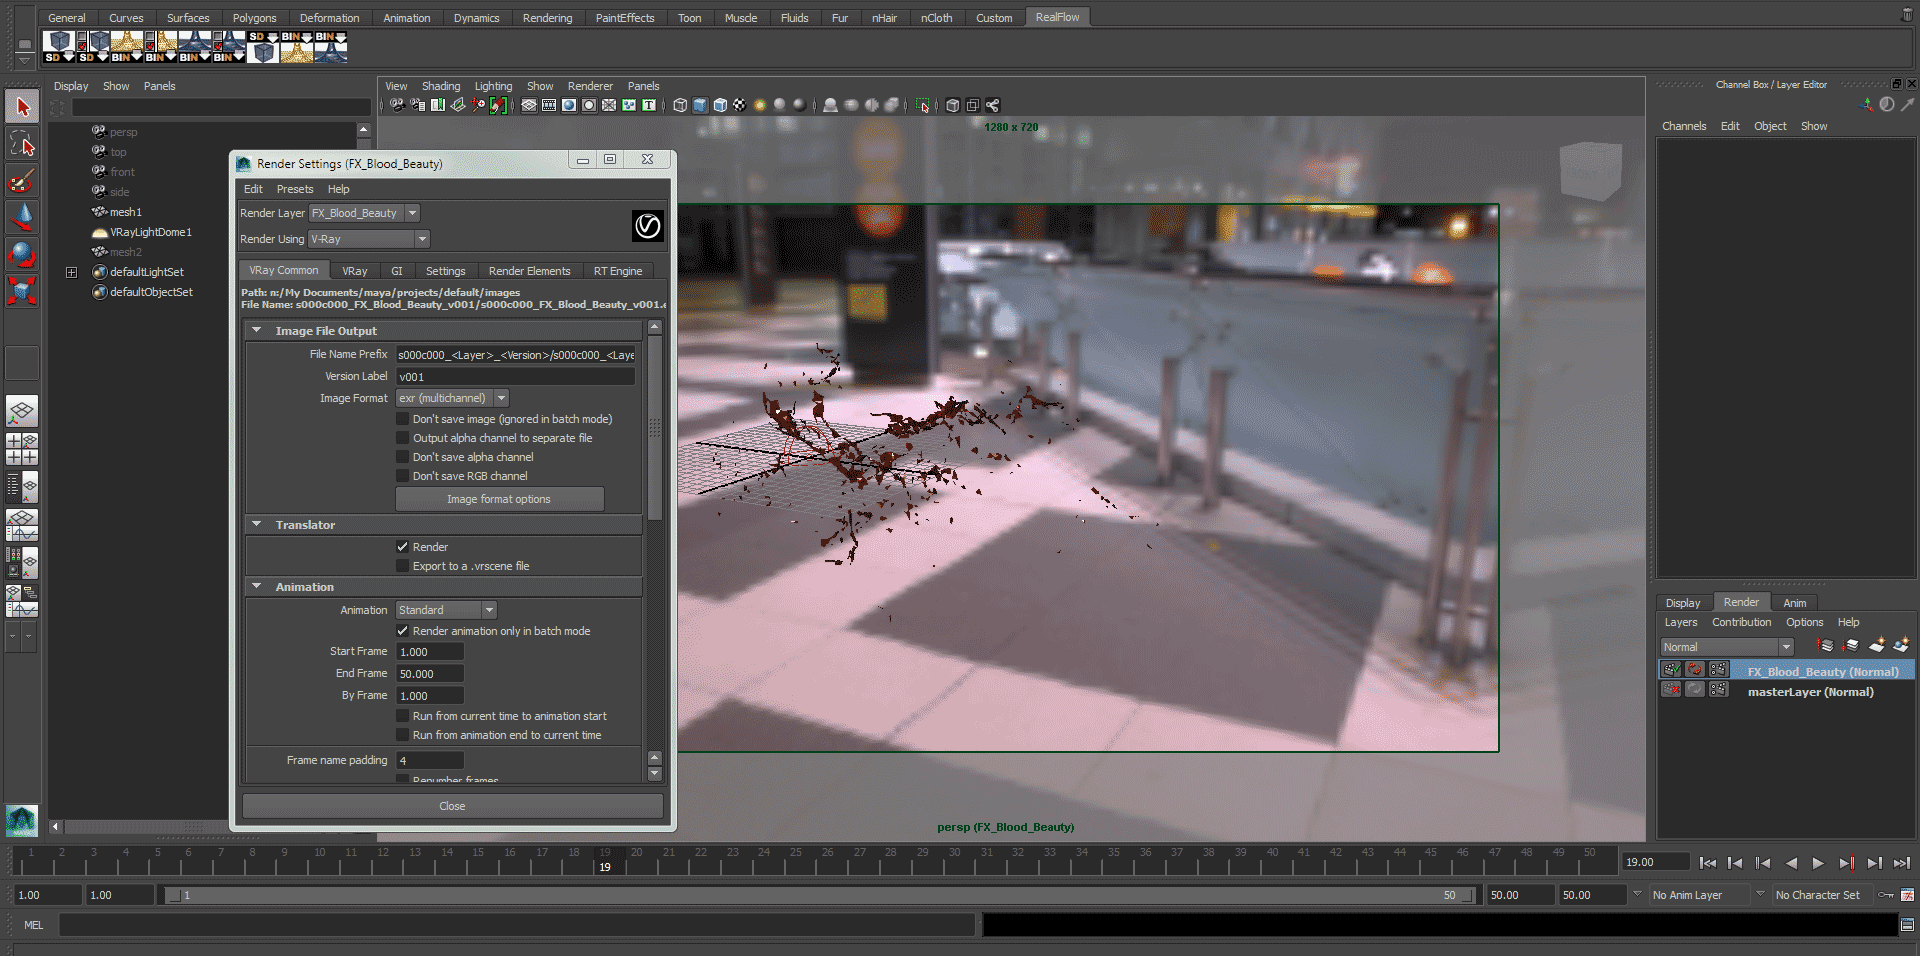
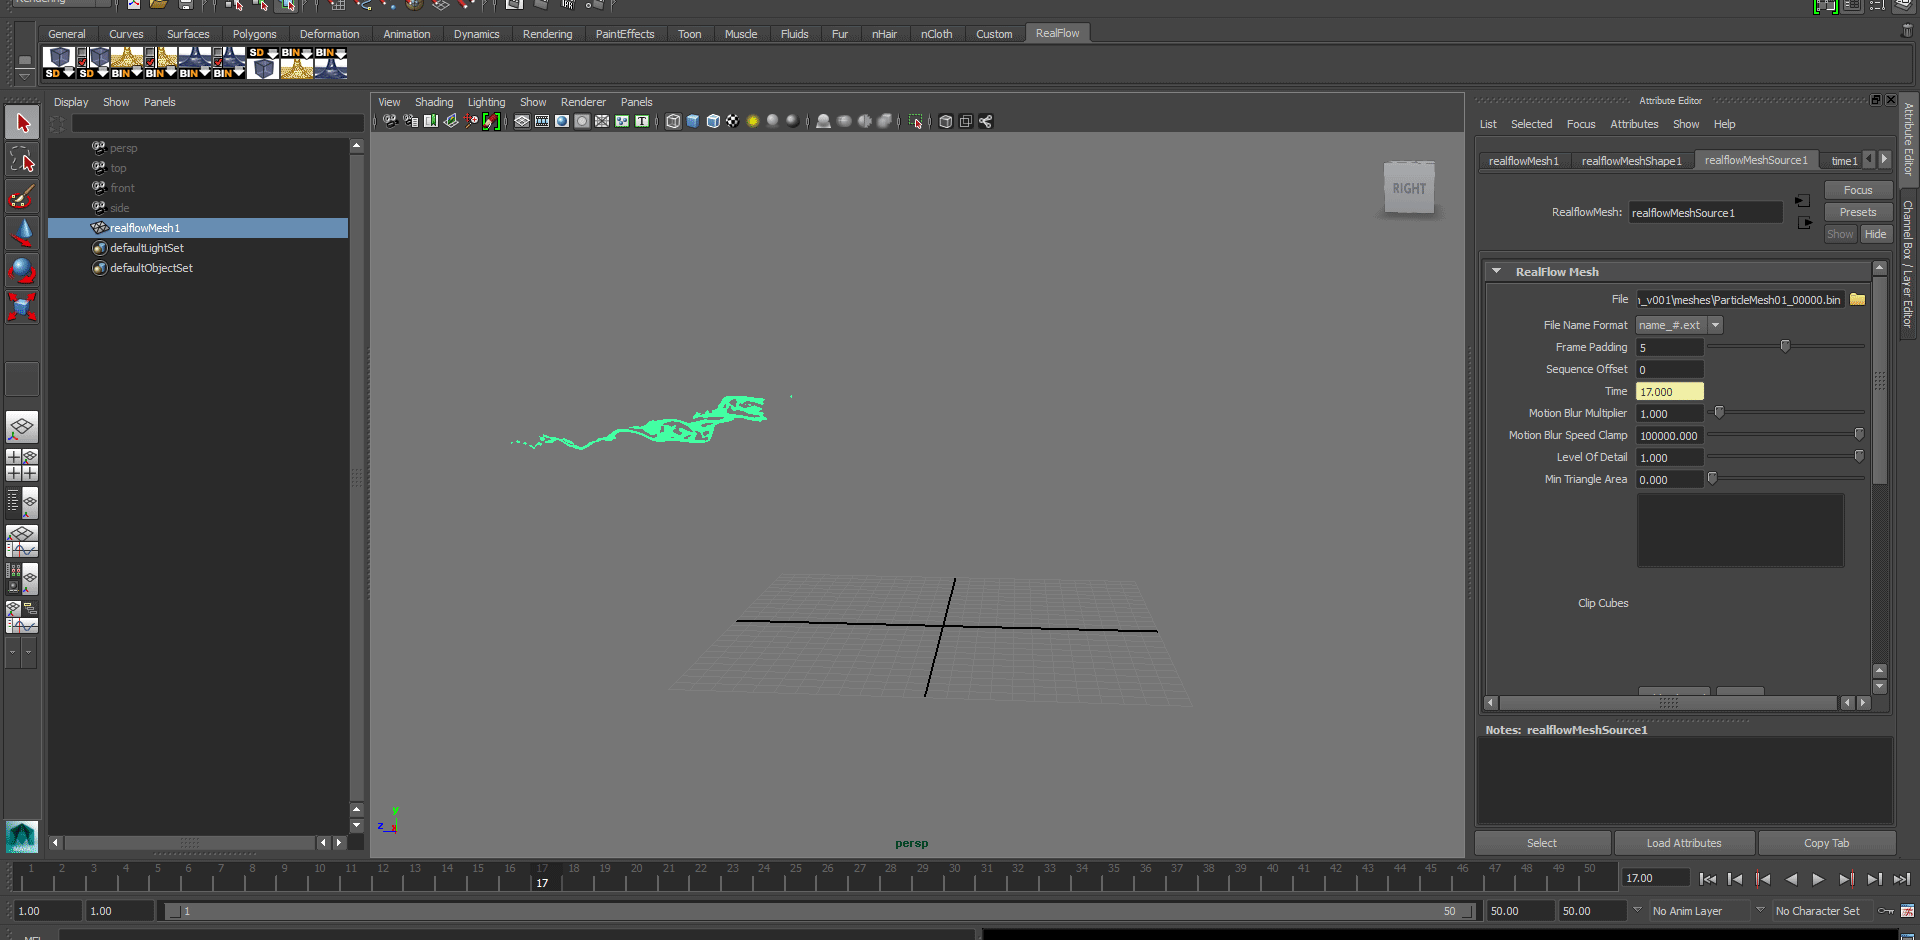
The above screenshot is taken from Maya with Vray .
To import the BIN mesh, it is as easy as clicking the import BIN mesh (the last icon in the toolbar/shelf) and navigate to the blood mesh directory:
And here we go, the blood mesh inside Maya.
Future updates
As mentioned at the beginning of this article, I hope that I can further delve into the look development of the Blood FX using Vray in Maya and composite the final result in Nuke.
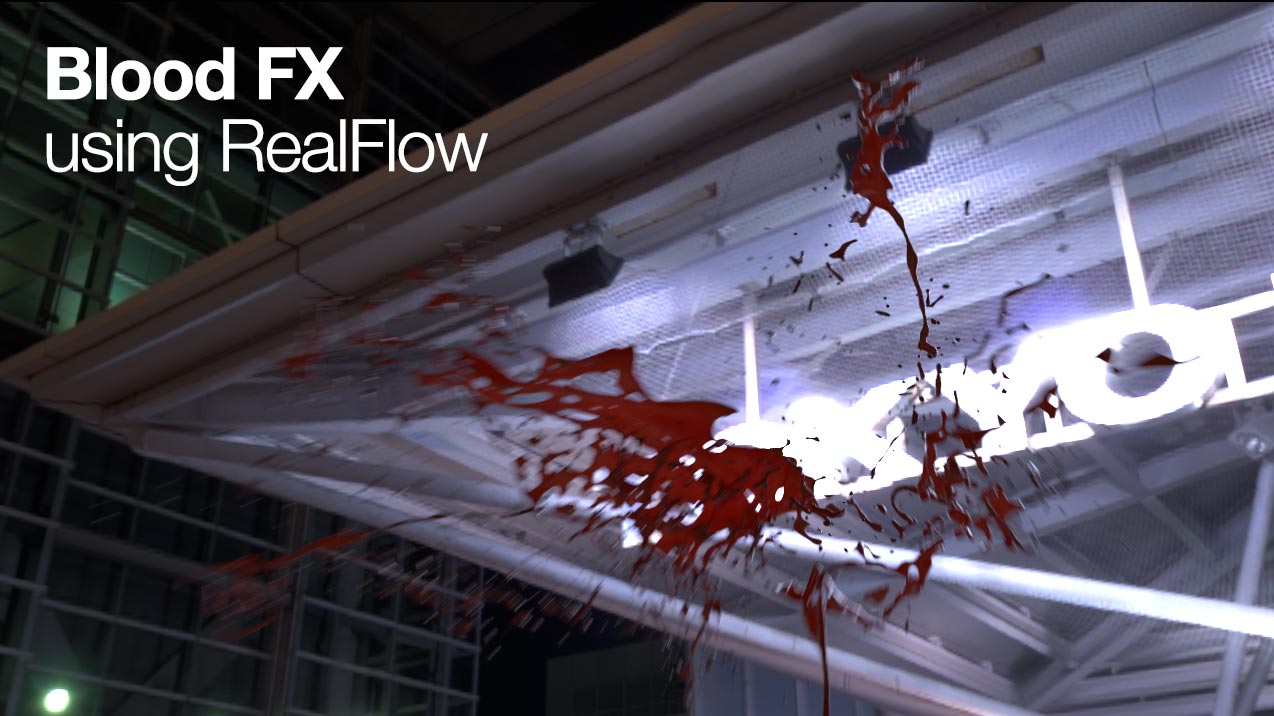
The header image is lit using a Tokyo Dome HDRI taken from hdrlabs.com with added motion blur using Nuke’s Vector Blur.
Hope you enjoy the bloody tutorial and do watch Gantz: O!

